As well as using Find to jump to one order you can filter the list to show customers that match a set criteria. All parts of the projects screen use filters as below:
Apply a Filter
1.Open the Projects screen (or Projects Combined) from the top toolbar.
2.Click Filter List to open the filter builder.
3.Select the criteria to filter by. The more options you select the more specific the filtered list will be (i.e. you will see fewer records).
Created Dates - You can type in any dates or click the drop down arrow to pick from presets such as "This Week", "Last Month".
= Is Like - Filters based on part of the criteria. E.g. picking "Promo" would also find "Promo Spring '13" and "Promo Summer '13" == Equals - Filters based on an exact match. E.g. picking "Promo" will only return "Promo" results <> Doesn't Equal - Filters based on the exclusion E.g. picking "Promo" will return everything except "Promo" ..... Multi-Select - Allows you to pick more than 1 criteria to do an "is like" filter. See heading below.
Multi-Select On Projects > Contact History and Sales Orders the filter window now supports "multi-select" meaning you are not restricted from filtering by 1 item in a drop down box, you can select up to 15 options. Select the first popup next to the filtered field and select “multi-select” (the menu shows .....) Another screen will appear where you can make your selections by putting a X in the box. Apply the filter as normal.
Group Filter filters specifically for customer groups (groups could be regions, room types, order types etc). Because a customer can be assigned to multiple groups you can build advanced rules. Insert each group and then build rules so you could show customers in 2 groups by adding 1 group, then click AND, then add a 2nd group.
All Fields - Allows you to search across every piece of data in case you don't know where it may have been entered (this can be slow on systems with large databases). |
4. Click ![]() Apply Filter to show the results list with a popup to show how many records are selected.
Apply Filter to show the results list with a popup to show how many records are selected.
Reset Filter
When a filter is on the Filter List button on the main screen is highlighted in pink:
![]()
Right-click on it to quickly remove the filter and show all records again.
Save a Filter
When you have created a filter you can save it for quick access in the future.
1.In the filter builder window, set your criteria as above.
2.Type in the name of the filter in the Saved Filters box and click Save Filter
Load a Filter
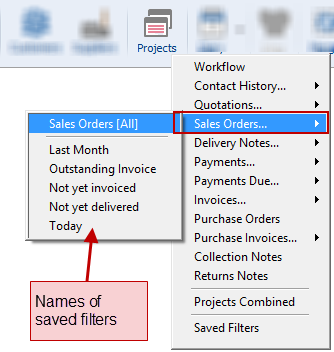
A saved filter will automatically appear when you click Projects on the top toolbar so you can jump straight to a filtered list.

Alternatively if you are already in the customer window you can click Filter List and select a filter's name from the Saved Filters box and click ![]() Load Filter.
Load Filter.
Auto Updating
If you save a filter that includes relative dates such as "This Week" then they will be intelligently adjusted if you load that filter and apply it in future weeks.