The resource planner allows you to manage visits and appointments visually. Typically this is used for deliveries and fitting type of actions. Actions are managed through EQ’s contact history which you can access from the customer screen > New Contact button and from the Diary and Schedule screens.
These instructions are for the Resource Planner "enhanced" version which uses Contact History in EQ. Before continuing ensure you have this enabled in Tools > Customise > Resource Planner and tick the box "Use Contact History". Click Update to save. (Beware of changing this if you already have data in the resource planner as it will not translate from the old resource planner to the new one. You will need to enter data manually).
Setup
To begin you need to decide which actions will be used on the resource planner.
Click the Diary menu and select Actions to show this screen:
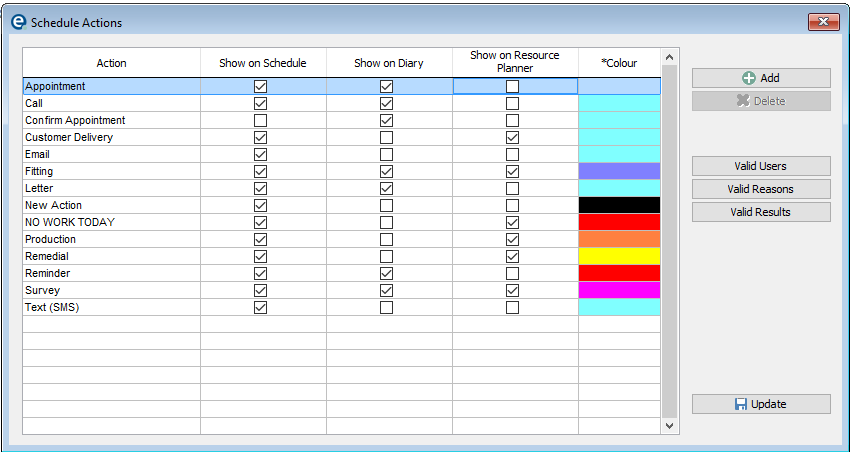
Tick the actions under the Show on Resource Planner column to enable them and press ![]() Update.
Update.
Customise
To setup the view of the Resource Planner, open it from the Diary menu button and click Customise at the top right.
On the Layout (Local) tab the most useful setting will be to see the visible columns (note you may have to scroll horizontally to see a large number) and the number of days that are shown. These are shown along the side. The greater the number, the smaller the boxes for each day appear. An optimal view is 14 days.
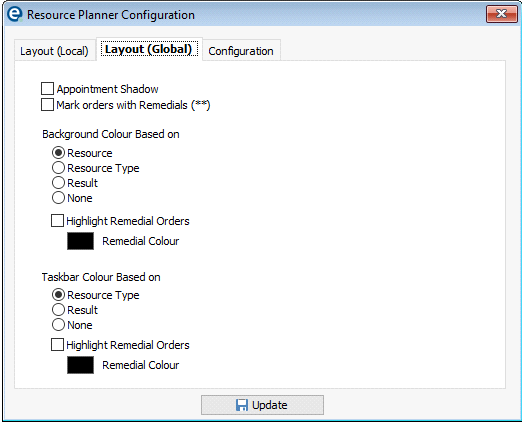
On the Layout (Global) tab you can customise the colours that are used for the background of the appointment block and the coloured bar on the left side of the appointment block
To customise which text is shown within the appointment block you need to close Resource Planner and go to Tools > Customise > Resource Planner and pick from up to 10 slots of text.
New Entry
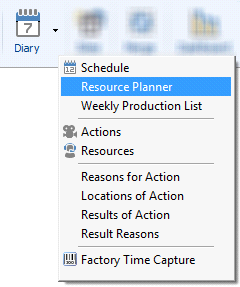
There are several points you can create a new contact history entry within EQ:
•Customer screen > New Contact button on the left
•Right-click the customer name column when you see a * in the column heading
•The New button from Schedule or Diary
When you begin a new entry you will see the screen below:
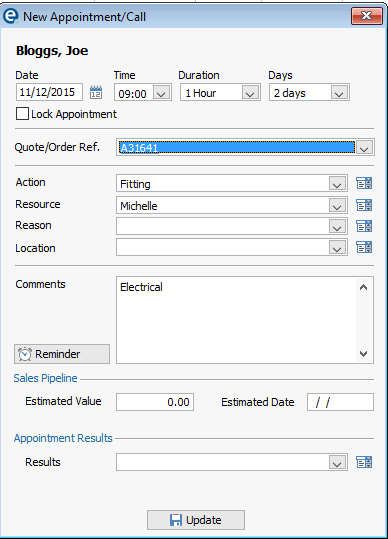
1.Select the quote/order for the customer and edit the date and time where necessary.
2.Use the Days duration box because Resource Planner will work with half day increments. (These can be changed on the planner later).
3.Complete the action, resource, reason, location and comments boxes.
4.Press ![]() Update to save and close. The entry is saved within Contact History and shown on the Resource Planner itself.
Update to save and close. The entry is saved within Contact History and shown on the Resource Planner itself.
Main Resource Planner Screen
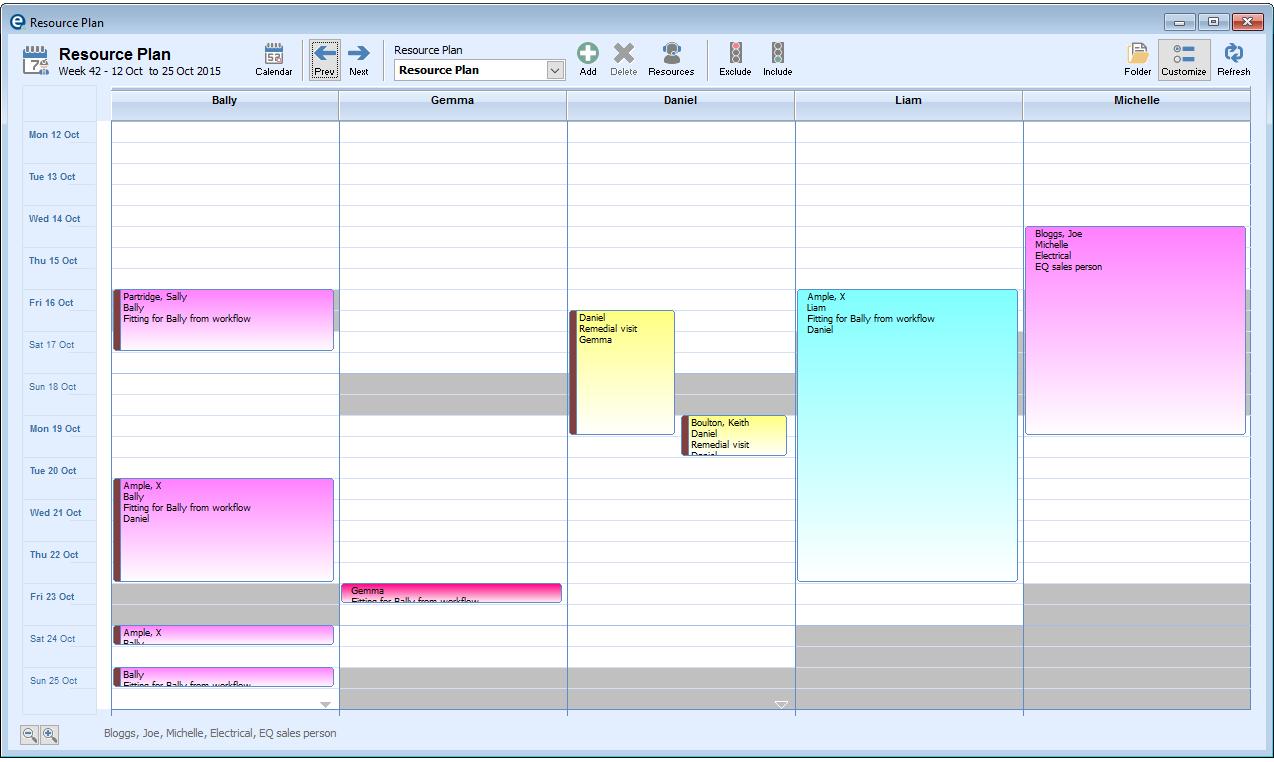
Click the Resource Groups button to select resources. Then highlight the resource group name and click the Resources button. Each name you add to the right will appear as a column along the top of the planner.
Use the Previous and Next arrows to navigate through the planner one week at a time, or click the popup calendar to jump to a specific date.

Appointments show in the screen as above. You can drag these to new positions (including new resource columns) by clicking and dragging the top edge of the appointment block. (Note you cannot extend or shrink the duration by dragging the bottom edge).
Non-working days (e.g. weekends) show in the colour selected in customise (see above). When an appointment starts before a non-working day and needs to finish after it, the appointment block will automatically span the non-working days so you can see the calculated completion date taking the non-working days into account.
If you need multiple resource plans (e.g. to split deliveries and fitting) you can click Add and enter a title. Change between the resource plans with the drop down box at the top. Each plan is separate so you would need to use the Resources button to select resources again.
Exclude and Include
![]()
To book out periods of time you can use the Exclude button on the top toolbar. Click and drag to highlight a time period (minimum half a day) and then click the Exclude button. Enter text such as “Booked Holiday” and click Update. Excluded time blocks will display in a different colour (set in customise, see above). You can click an excluded block to see the notes behind it at the bottom of the screen (see below).

Appointments which span excluded time blocks will automatically adjust to include it, in the same way as they span over non-working days.
You can reverse this by clicking and highlighting the same time period and clicking the Include button.
Other Filtering
Because the entries on Resource Planner are contact history entries you also have the ability to filter, export and print the entries for reporting purposes within the Projects screen.
Click Projects > Contact History and use Filter List to narrow down the type of actions, resources, dates or other criteria. You can then use the Print List or export buttons to send to a spreadsheet.