You can export the following data from EQ in to Sage Accounts, desktop based accounting software. Includes Sage Accounts, Sage Accounts 50 and Sage Accounts 200.
For instructions to work with Sage Accounting, the cloud based software please click here.
•Customers list
•Suppliers list
•Sales invoices
•Purchase invoices
•Payments (from customer)
The procedure below shows how to export customers, but it is a very similar procedure for suppliers and invoices. It is not an automatic link so do this regularly to keep Sage up-to-date.
You can export the following data from EQ Professional / EQ Essential in to Sage Accounts. This is an additional module, please contact sales for advice and purchasing. This process requires Sage Accounts 50 version 16 and newer. •Customers list •Suppliers list •Sales invoices •Purchase invoices •Payments (from customer)
You can be selective and just export customers with sales invoices, you do not have to do the suppliers and purchase invoices. If you have an existing customer list/supplier list you are advised to match EQ’s account numbers to those in Sage. If starting with an empty Sage list, you can export your list from EQ.
EQ will export 1 row of detail per invoice if using Sage Accounts 50 version 16 and newer.
You need to export regularly to keep Sage up-to-date.
Data export from EQ
Customers List •Account number •Name •Full postal address •Postcode •Work telephone •Mobile telephone •Fax number •Email address •3 x customer analysis fields, e.g. showroom, promotion etc. •Customer nominal code
Suppliers List •Account number •Supplier name •Full postal address •Postcode •Telephone number •Fax number •Email address •Website address •Nominal code
Invoices (Sales and purchases share the same file structure) ▪Transaction type ▪Account number ▪Sales department number ▪Invoice date ▪EQ order number ▪Own reference number (can be customised for purchase invoices) ▪Invoice nett value £ ▪VAT rate (T1 – T9) ▪VAT value £
Customer Payments ▪Transaction type ▪Account number ▪Nominal code ▪Sales department number ▪Date of payment ▪Order reference ▪Description (“Balance”, “Deposit” etc) ▪Value £ ▪VAT rate (T1 - T9 )
(Note that VAT is not separated on customer payments export) |
Export from EQ (Customers)
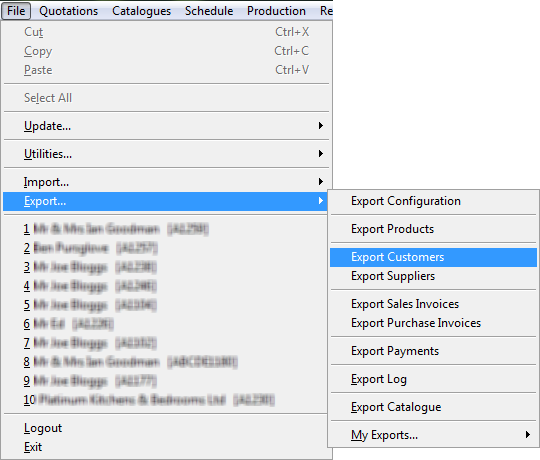
1. Click onto File > Export then select what data to export from:
Customers
Suppliers
Sales Invoices
Purchase Invoices
Payments
2. It then asks the type of file to export.
By default it will save to your C drive, but you can use the browse yellow folder icon to change this to any location.
Pick the correct file type:
Sage Line 50 – For Sage versions 11 and older.
Sage Line 50 v12+ - For Sage version 12 and above.
If you tick the box that says new accounts only this will only export new customers and not override any of the existing ones (i.e. it is a cumulative export).
3. Then click on to Export.
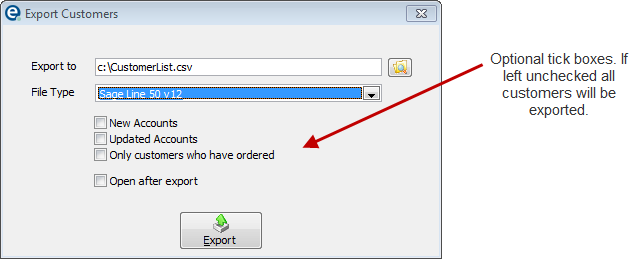
4. When asked “Flag customer records as sent?” respond No (the first time you run the export).
IMPORTANT: Return here after you have verified that all customers are showing in Sage, after you have completed the import.
Import to Sage (Customers)
5. Open Sage then click onto File and Import
6. The import wizard opens, which guides you through the import process.
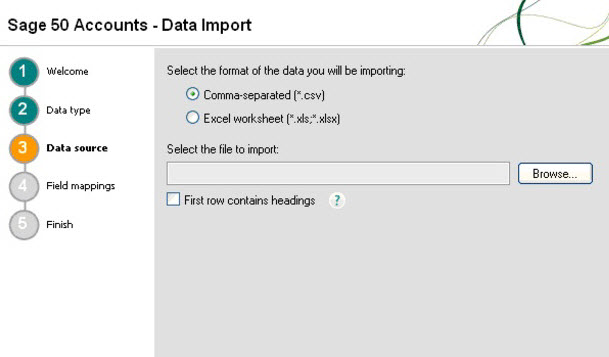
The first time you run this we must configure the EQ file with Sage. This only needs to be done once for customer records, and once for sales invoices. When you run this in the future you can load the settings “Map”.
7. The Sage import wizard opens. Select “Customer records” and click Next.
(By default, the file will be on the C drive called CustomerList.csv)
8. Select the file type as CSV (comma separated) and click Browse. Locate the file that EQ created (it will be named CustomerList.csv and saved on your C: drive by default). Click Open.
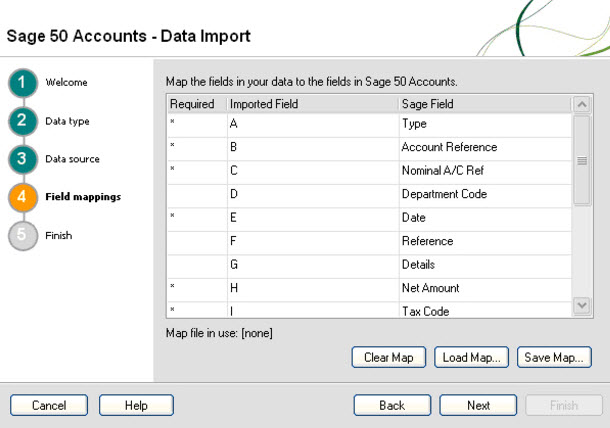
9. You need to map the data so that Sage knows where to find each bit of data. Click in the Imported Field column and you need to select the data as below:
Importing the customer list |
Importing the invoices file |
A Account reference B Name C Address line 1 D Address line 2 E Address line 3 F Address line 4 G Postcode H Contact name I Work phone number J Fax number K Customer classification (sales person) L Customer classification (show room) M Customer classification (customised in EQ) W Nominal code Z Mobile phone number AA E-mail address |
A Type B Account reference C Nominal a/c ref D Department code E Date F Reference G Details H Net amount I Tax code J Tax value |
9. The first time you run this click Save Map, accept the default name and click OK.
Then click Next and the import will summarise, then click Next again and the import will proceed.
The end screen lists all the data that was imported (and data that would not import).
You can then view the customers in the Sage customer screen.
Now that you have all of your customer records in Sage, you must bring through your sales invoices from EQ to Sage using the same process. See the next page for specific details on importing invoices and payments.
NB: When you have verified the data is in Sage you should go back to EQ and create the identical export file and respond YES to flag the data as sent. This will make sure the same data is not exported twice.
Other Exports
Export Sales Invoices
You can repeat the same steps above to export your sales invoices from EQ. From EQ’s File menu select Export and then select Sales Invoice. Always make sure that the file type is Sage Line 50 v12
To import the invoices into Sage follow the same procedure but from the Sage import wizard select Audit Trail Transactions. Map the fields as they are shown in the table above. (Once the “map” of data has been completed and saved the first time, you can click Load Map)
Once the file has imported the data will be displayed on the screen. Once you have verified the data in Sage, return to EQ and mark the export as flagged.
Export Purchase Invoices
Repeat the same steps to export the purchase invoices from EQ; click File > Export > Purchase Invoice. Type in your range of dates, tick the invoices to export and click Export.
When importing to Sage select File > Import and select Audit Trail Transactions.
(Once the “map” of data has been completed and saved the first time, you can click Load Map)
Export Payments
Repeat the same steps to export customer payments from EQ; click File > Export > Payments. Type in your range of dates, tick the payments to export and click Export.
When importing to Sage select File > Import and select Audit Trail Transactions.
All exports should be carried out on a regular basis to keep Sage up-to-date.