Click the ![]() Cab Builder icon > Edging Tapes button
Cab Builder icon > Edging Tapes button
This is your master list of panels which will be used to construct all of the products that you manufacture. Panels are 3 dimensional – they have a Height (which always follows the grain direction if it’s woodgrain), a Width & a Depth (or Thickness). The Height & Width are usually parametrically calculated using the modifiers that you have configured. The depth (or thickness) will be determined based on the type of material that will be used to make that panel.
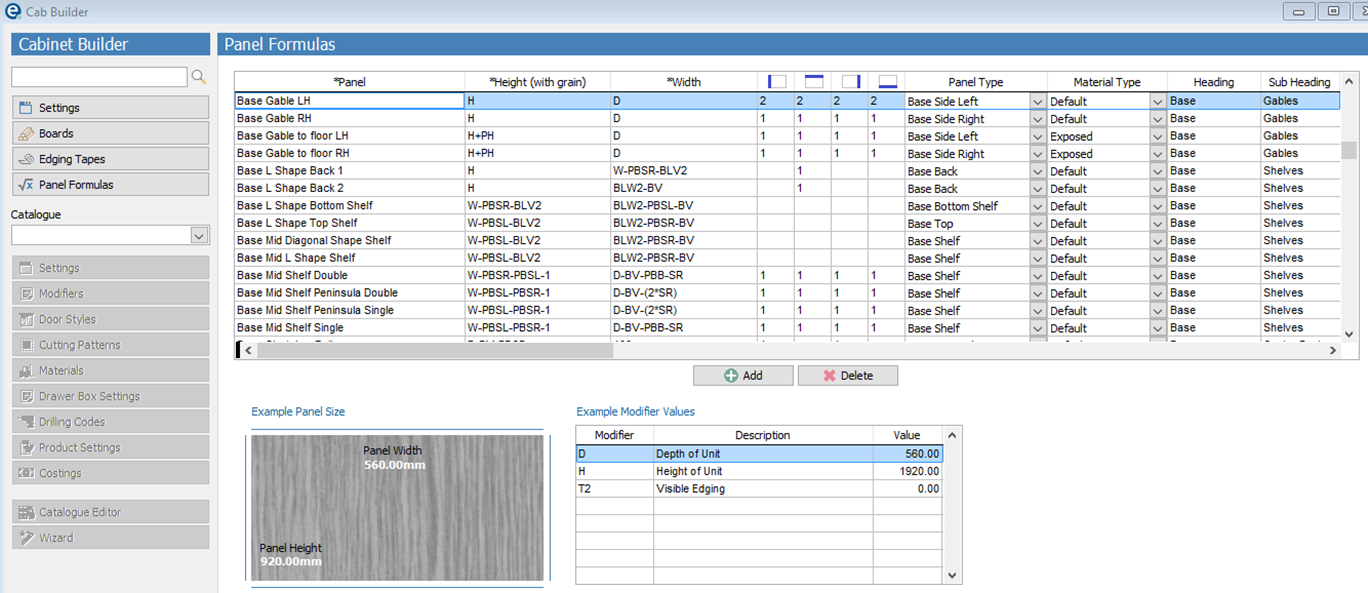
1.Add panels to this list by clicking the Add button in the middle of the screen. Give your panel a name, and then type in a formula to calculate the Height of the panel. An easy one would be simply “H” – this would then calculate the panel height to be the same height as the item (unit) that it will be used to construct. A slightly more complicated formula would be “H+PH”, which would calculate the height of the panel to be the height of the unit to which it relates, plus the height of the plinth. So if a unit is 720mm High, the plinth height is 150mm, then the panel height will be 870mm high. This would change with the height of the unit and/or Plinth.
2.Your formulaic expressions can be found in the list of Global Modifiers – it’s these “codes” that are used to calculate values.
3.Do the same to calculate the width of your panel.
4.Select which sides of your panel will require edging by clicking into the relevant boxes & selecting what sort of edging you want to attach to the side of the panel.
5.Select the Panel Type (this will determine the type of material the panel will be made of – these Panel Types will link to your board colours later on) and whether or not the panel should always be made out of the Default Material Type (as in, defaulted relevant to the material you select relevant to your catalogue headers – see section on “Materials”), or if you want this specific panel to ALWAYS be made out of Exposed or MFC Material.
6.Set the Page Headings & Sub Headings for this panel. These are seen on the Production Paperwork & allow you to group similar panels together instead of having a big long list of different panels.
Shortcuts
•Right click on your formula to view the description in full, or to see a list of logical & mathematical expressions that can be used in the creation of your formulas
•You can see an example panel in the bottom of this window – simply fill in the values in the matrix on the right to give you an example panel size
•Right click on a Panel Description to duplicate it (for similar sorts of panels – you’ll need to rename the duplicate) or to see a list of Cutting Patterns the panel is attached to. See Section “Cutting Patterns” for more info.