Click ![]() Diary > Actions
Diary > Actions
Actions allow you to differentiate between types of information on the schedule. On a multi user system you can have different users see the same schedule but only show the types of appointment that is relevant to them. For example a salesman does not need to see customer delivery dates.
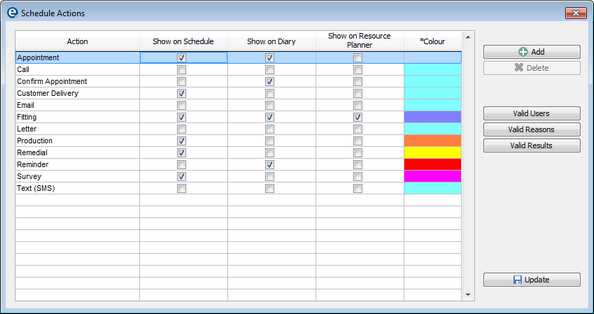
There is a preset list of actions
Reminder Appointment Survey Fitting Remedial Customer Delivery Confirm Appointment Call Letter Production Text (SMS) |
Click Add to add a new action.
Right-click the colour block to change (the colour is the "stripe" shown on the left of the appointment block)
Now decide where you will view (and edit) these actions by placing a tick in the follow columns (see example above):
On Schedule
On Diary
On Resource Planner
You can restrict which actions show according to the 3 options on the right:
Click this for each action to restrict which actions are valid for each user. E.g. staff who always book calls and appointments will benefit from a shorter list, as they do not need to see fitting, production etc.
The users list is the same as the list in Tools > Users where you can add/remove users. |
Restrict which reasons are available for the currently selected action 1.Go to Schedule on the menu bar > Schedule Actions 2.Select an action 3.Click Valid Reasons 4.Untick the "ALL" box and select which reasons are appropriate for the currently selected action. 5.Repeat for each action as necessary.
E.g. if action is "call" the reason could be "confirm appointment with customer" (Once completed the reason can also have a result, such as "Appointment to re-schedule")
To edit the list of reasons go Schedule > Reasons for Action |
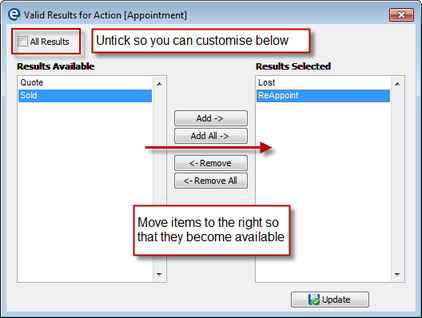
Restrict which results are available for the currently select action. Repeat for each action as necessary E.g. If action is "appointment" the result could be "sold" or "lost"
To edit the results go to Schedule > Results of Action |
Click ![]() Update to save and close the window.
Update to save and close the window.

