Any columns displaying a * in the column heading have right-click options. Ensure you have expanded the screen so you can see all options. See Customise the screen. |
The Purchase Invoices tab lists all purchase invoices and purchase credits that have been recorded against the corresponding purchase orders. For every invoice/credit you put on the system, an entry will be created here (as well as updating the costings screen with actual figures).
By default they are listed in order reference order with the newest at the top.
Right-click Supplier Inv/Ced. No.
Right-click the invoice/credit number to access this menu:
Edit Purchase Invoice
Click to make changes to the invoice/credit note including changing the values or re-allocating money to other products.
See also: Record Purchase Invoices and Record Purchase Credits
Cancel Purchase Invoice
Select to cancel the purchase invoice/credit.
Flags... >
Flags allow you to label an order for a particular reason (e.g. an order temporarily on hold) with the advantage that you can filter by flags. Hover your cursor over Flags and click Flag Setup to label the flags. Click Clear Flags to remove a flag from the selected order.
Right-click P/O Ref.
Right-click the purchase order reference number for this menu:
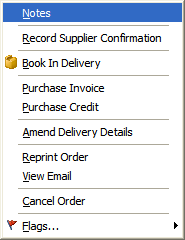 Notes
Notes
Record notes here relating to the purchase order. They appear in the Notes tab at the bottom of the screen. Ensure you have the expand options enabled.
Record Supplier Confirmation
If your supplier confirms they have received the delivery, record the date, their reference and any notes here.
When the delivery is received book in the goods here.
Record a supplier's invoice against your order. Doing this completes the "Actual" column of the costings screen. Repeat to add more than one invoice.
Record a supplier's credit note against any products on the order here. Repeat to add more than one credit note.
Amend Delivery Details
Click to make changes to any delivery details and add notes for the purchase order.
Reprint Order
Print or preview the purchase order. It will display the words "Amended" on the paperwork unless you have disabled this in system setup.
View Email
If the purchase order was originally e-mailed rather than printed click this to view the contents of the order in email format (HTML) as it would have been sent originally.
Cancel Order
Click to cancel the whole order or select items from the order to cancel. You will have the opportunity to print a cancellation order sheet in case you need this for your supplier but you do not need to print it.
Flags... >
Flags allow you to mark label an order for a particular reason (e.g. an order temporarily on hold) with the advantage that you can filter by flags. Hover your cursor over Flags and click Flag Setup to label the flags. Click Clear Flags to remove a flag from the selected order.
Right-click Order Ref
This right-click menu is the same across all quote/orders and is a shortcut to many options.
Searching and Filtering
See the Projects overview for how to search and filter data.
Export to Excel (or CSV)
Click to export the current projects screen view to an Excel spreadsheet. The spreadsheet opens automatically so you can edit and save as required. If you have filtered the list the export will be the filtered list too. Note you cannot re-import the spreadsheet data back into EQ.
By default exporting to Excel requires MS Excel 2013 and older to be installed on the same PC as EQ and requires a compatible version of Excel. In EQ version 14 you can select to export as CSV which will save your file and open in any compatible spreadsheet program. See Tools > Customise > Project Tabs > tick 'Use CSV format for all Excel exports'
Print List
Print the current list view. If you have filtered the list the print out will be the filtered list too.
Select Columns
Show a list of column headings you can add into the current tab. Place a X check mark by title to display the column.
You can re-arrange the columns by clicking on the column heading and dragging it with the cursor to a new position and then releasing the mouse button. You can change the column width by clicking and dragging the dividing line of a column.
Related Topics: