In addition to creating Cutting Patterns for cabinets, Cabinet Builder can also configure cutting patterns for doors too. The configuration is almost exactly the same as for Cabinets but there is no wizard for Doors and so each part may need to be configured completely from scratch. The main difference is the extra step to create Door Styles – an extra level that allows us to determine which list of panels or Cutting Pattern to use based on the Style of the door, something you don’t have with cabinets.
Product Codes are usually available in multiple groups, and as such the Door Style will determine which variation of the cutting pattern is used for each item.
Global Settings
•Make sure you have configured any Modifiers you may need in Global Modifiers (examples include Stile Width, Rail Height, Cross Rail Height for Shaker-style doors)
•Make sure your Door Material is linked to the Door Range/Colour Prompt in Global Settings > Material Types
•Ensure you have Panel Types from which to make your Door Panels in Global Settings > Panel Types. You will link boards (materials) to Panel types, based on the Door Group, later on.
Examples of Panel Types would be Centre Panels, Stiles & Rails, Framing (for In-Frame Doors)
Boards
•Make sure you have the relevant Boards (materials) entered from which to make your doors from – don’t forget that you may need multiple materials but in different thicknesses, if for example your Centre Panels are made out of a different thickness to the stiles and/or rails. Doors can be made from the same material as carcases.
Edging Tapes
•Make sure you have the relevant Edging Tapes entered. Edging Tapes can be the same as those for carcases.
Panel Formulas
•You will now need to configure the panels, along with their relevant formulas, that you’re going to make your doors out of. These will likely include centre panels, rails, styles, slab doors and framing panels (if you manufacture in-frame doors).
Catalogue Settings
Load your Door catalogue & start with Settings. Ensure Cab Builder 2 is enabled and make the relevant selections for your catalogue.
Please note that if your catalogue is being published for other companies’ use then it is not advisable to enable the catalogue editor OR use any other Pricing Method other than “Catalogue Price”.
Modifiers
Here you can add any modifiers that are specific to this catalogue. An example would be if you’ve got 2 door catalogues, 1 is in-frame & the other is lay-on doors, you may have a different stile width or rail height for the in-frame doors to the lay-on ones. This allows you to configure the defaults for each. Just remember that in order to add a modifier in here, it will need to exist in your list of Global Modifiers first.
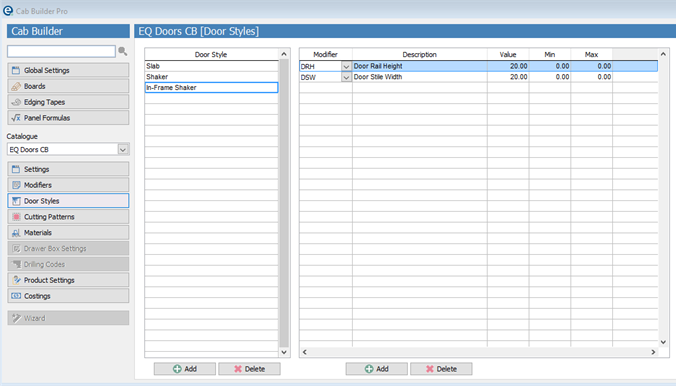
Door Styles
These will be linked to your Catalogue Heading Price groups (the 1st drop-down selector for doors when you create a quotation) later on. Think of them as the construction method for each of your door ranges, as quite often more than 1 range will utilise the same construction method. 2 simple examples of Door Styles are Slab, Shaker, or In-Frame Shaker.
You can set different default modifiers here too. For example, if the Stile width is likely to be different for a 715x597mm door that is a [lay-on] Shaker to that of an In-Frame Shaker, this can be configured here.
Add a door Style by clicking “Add” at the bottom on the left. Name your Style & if necessary add any relevant Modifiers against this style using the Add button at the bottom Right.
Cutting Patterns
Here you need to configure the cutting panels for the different types of doors within your catalogue. Later on, we will link the cutting pattern to each individual door.
We can configure different cutting patterns for the different door styles & door types – so a 715 x 597mm door will have the cutting pattern “Door” assigned to it, but depending on whether the door is a Shaker, Slab or In-Frame Shaker style, will determine the list of panels associated with the cutting pattern.
Select your Door Style from the top drop-down, then add in a Pattern Name using the Add button at the bottom left. You will now need to add in the relevant panels using the Add button on the right, based on the style of door for this pattern. An example of Pattern would be “Door” or “Drawerfront”.
Now change the Door Style at the top, and add in the relevant panels for the Pattern in this style.
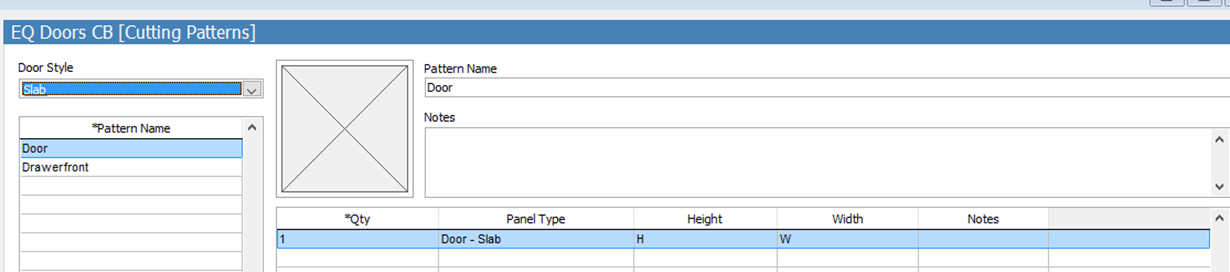
In the example above, the Door Style is “Slab” and the Pattern Name is “Door”. Note that we have only added 1 panel into the panel list on the right.
When we change the Door Style selection to “Shaker” (see example below), you can see that we have added a different list of panels against the Pattern “Door”, as a Shaker style door is more complex & requires different panels.

Repeat the process for the different Patterns that you will need.
Other examples of patterns might be for Drawerfonts, Larder Doors (sometimes these have a cross-rail for added strength), End Panels, Glazed Doors, Canopies etc.
Materials
This is where many of the dots are joined together.
Choose your Door Group in the table on the left, and select which Style of door this relates to (you should have created your Door Styles already).
Then select the Materials for which you will make each of the panel types out of, based on the Door Group.
Usually Centre Panels would be made out of a different thickness of material, if not a different material altogether, than Rails & Stiles. Door Panel types should already have been configured in Global Settings.
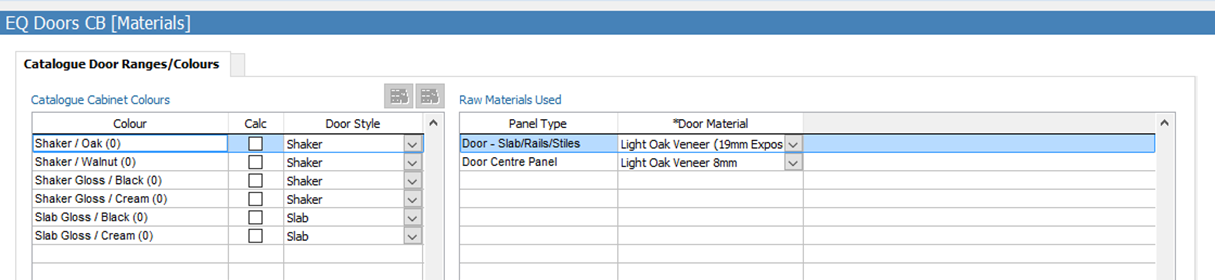
Finally, select each Edging tape colour at the bottom & link the relevant Edging Tape materials to each colour on the right

Product Settings
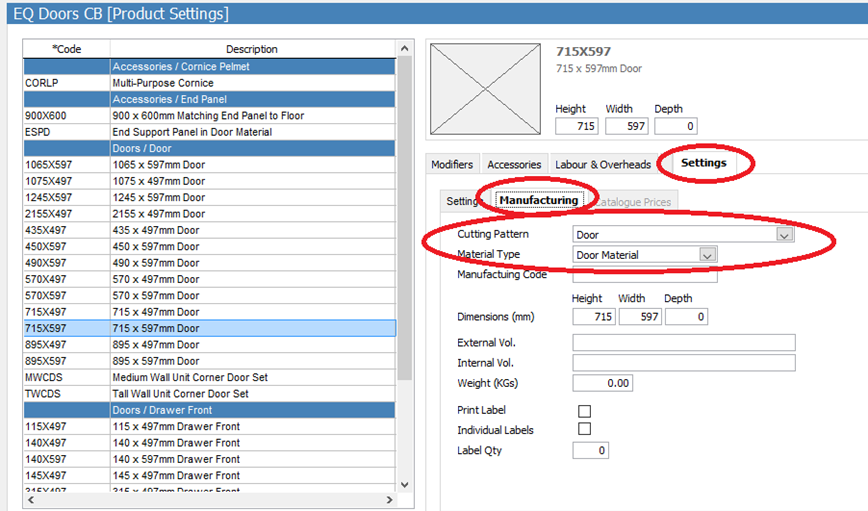
This is where you can attach modifiers, Accessories, Labour & Overheads and Cutting Patterns against the individual items.
Select your item from the list on the left, and add any item specific modifiers, accessories, Labour and Cutting patterns against it by clicking on the tabs on the right.
To attach a Cutting Pattern, select your item, click the “Settings” tab & the “Manufacturing” tab within this section.
Select which cutting pattern this item will utilise – remember the list of panels will change based on the Group that will be selected when you begin your Quotation.
Remember to select the Material Type also.